
How to fix Email not sending in WordPress: A typical problem we see amongst website owners is WordPress not sending out e-mails appropriately or in any way. The majority of handled WordPress hosting service providers, do not offer e-mail hosting. Nevertheless, that does not imply you cannot send out e-mails. Usually, when you try to repair the WordPress not sending out e-mails issue, it is not an issue with the webserver, instead, improper WordPress setup for emails has been done, or there is a conflict.
Comply with the steps listed below to obtain email working on your WordPress website. This needs to apply to practically any type of WordPress hosting provider, in addition to WooCommerce not sending out e-mails.
Some Typical Scenarios When WordPress Cannot Send Out Email
Most of the times end users usually experience WordPress e-mail issues in the following situations:
– At the times of using Contact Forms: For instance, you might never get an e-mail alert that a contact form was sent, if a site visitor submits a contact form, either utilizing WordPress theme’s built-in form or a Third-party plugin like the widely-used Contact Form 7, after that.
– At the time of Send out Notifications: This consists of e-mails informing you of password resets, brand-new end user enrolments, automated updates, article/post comments, and also a lot more.
– At the time of using Third-Party Plugins: Alerts from popular plugins like WPForms and WooCommerce usually are missed out on as a result of WordPress not sending out an e-mail.
In the mentioned above scenarios, your messages might land up in spam, or never ever make it to your inbox. Prior to we talk about the best ways to repair this problem, let’s analyze why this takes place.
Ways to fix Email not sending out Problem in WordPress?
If you’re experiencing problems with WordPress cannot send out e-mails– for instance, sending out forms or various other interactions– it’s typically a result of issues with your web server setup.
Like numerous web applications, WordPress makes use of the PHP ()mail feature to disperse e-mail as well, on a properly set up web server, the function needs to function correctly without the requirement for individual configuration. Nevertheless, web server hosts might put short-term or long-term limitations on making use of PHP ()mail to minimize automatic spam.
Switch to SMTP (Simple Mail Transfer Protocol) instead, if your WordPress e-mail is not being sent out
Option 1: Utilize your e-mail account’s SMTP web servers
Action 1: Download and install, set up, and also turn on the WP Mail SMTP plugin from the WordPress database.

Action 2: Choose the Setups web link (or Settings > Email web link in the sidebar) to set up the plugin.
Action 3: Enter into your e-mail and also name credentials in the Mailer area. Make sure to Send out all WordPress e-mails by means of SMTP should be selected.
Action 4: In SMTP Options, complete the process of a configuration utilizing your web server setups. You could check these options by clicking on the Email Accounts button as well as by checking out My cPanel in the Dashboard.
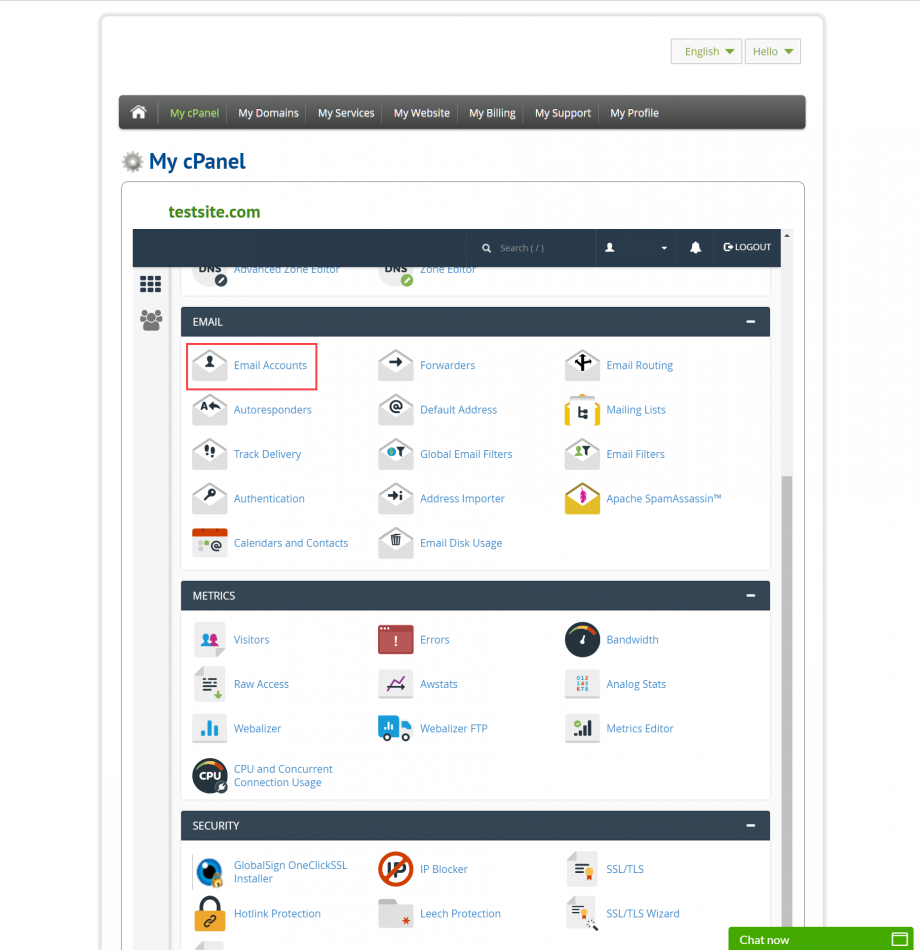
Action 5: Scroll to the Email Accounts option. Select the Setup Email Client URL to check out your SMTP configurations. Make Sure Yes: Usage SMTP authentication is checked out. Enter your SMTP login information
Action 6: Click on the Save Modifications button, after examining your configurations by getting in an e-mail address in the To field under Send out a Test Email. To continue, select the Send out Test button. If you do not get an e-mail, inspect your SMTP configurations.
Option 2: Make use of Google SMTP e-mail web servers
The 2nd alternative utilizes a totally free Gmail account from Google as well as the firm’s SMTP web servers.
Action 1: Visit the Gmail website as well as set up an account. The following setup steps deal with totally free Gmail or Google Application accounts.
Action 2: Download and also set up the Gmail SMTP plugin from the WordPress Plugin database, once your Gmail account is configured.

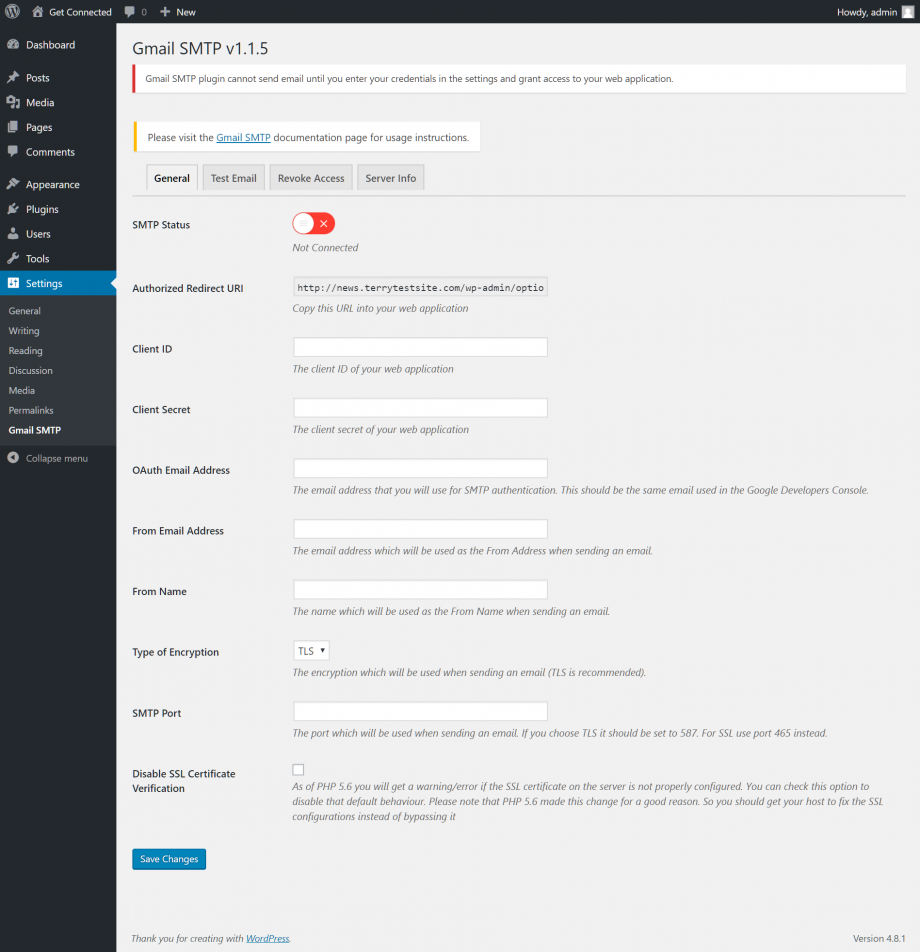
Action 3: As soon as activated, go to Settings > Gmail SMTP to set up the plugin.
Action 4: To accredit your WordPress setup to make use of Google’s e-mail web servers, you need to produce a collection of safe and secure credentials. Initially, open up a brand-new web browser window/tab as well as check out console.developers.google.com. Visit with your recently produced Gmail account information, or one more Google account.

Action 5: Click On the My Project web link on top of the display as well as, in the panel that shows up, click on the Include (+) key to produce a brand-new task.

Action 6: Assign a name for the task (any kind of name is going to do) as well as click on the Generate switch to continue.

Action 7: In the left-hand side sidebar, click on the Enable APIs and also Services web link on top of the display once Dashboard is selected.

Action 8: Pick the Gmail API web link option appearing under G Suite APIs.

Action 9: On top of the display, click on it to continue if you see an Enable web link. We currently have to produce gain access to credentials for usage with the Gmail API. Choose the Credentials option from the left-hand side sidebar and afterward select Create credentials option.

Action 10: In the menu that shows up, choose OAuth client ID.

Action 11: Choose Web application and after that click on the Generate tab in the Application type display. To produce an OAuth customer ID, you have to establish an item name initially. Go into a name, after that go back to your WordPress admin dashboard.
Action 12: Duplicate the components of the Authorized Redirect URI area right into the appropriate area of the Gmail API Produce client ID web page.

The results will appear as shown below:

Action 13: Currently click on the Create key. A collection of OAuth client credentials are going to be shown on display.

Action 14: In the plugin’s Setups web page, copy and paste the Client Secret as well as Client ID right

Action 15: Continue to set up the continuing to be plugin setups.
- E-mail Address: When sending out an e-mail, the e-mail address which is going to be shown.
- From Name: The name which is going to be shown when sending out an e-mail.
- OAuth Email Address: This needs to coincide e-mail made use of in the Google Developers Console. The e-mail address is used for SMTP authentication.
- Type of File encryption: By default, TLS should be selected. The encrypted shield is going to be utilized when sending out an e-mail (either TLS/SSL).
- SMTP Port: On selection of TLS, it would be 587. For the SSL usage port, it would be 465. It will be the port that is used at the time of sending out an e-mail.
Action 16: Click on Save Changes to continue. Click on the Grant Permission key that shows up.

Action 17: Enter into your Gmail account credentials to license the link.
Inspect that your SMTP Status currently should be Connected. You could now continue to the Test Email tab to experiment with the brand-new e-mail link.