if you deal with paperwork in your office, chances are high that you do a lot of printing using your computer or laptop. But when it gets to a point where your device is paired to more than one printer, some of which you may not need. You may delete the unwanted printers thinking that you’ve freed up extra space. The truth is that the printer drivers haven’t been removed and are stored within your PC’s local inventory. You need to eliminate it from your PC to free up space, improve performance and prevent future incompatibility issues. Learn how to delete printer drivers on windows 10 in the following sections
Delete Printer From Windows 10
Contents
You must undergo two processes to completely delete the printer from your PC. Begin by -removal; of the printer from the system and secondly, delete the printer driver using PowerShell or printer management
Remove the printer from Settings
- Launch the Settings App
- Navigate to the Devices window
- Choose a printer & scanner from the listed options
- Select the printer you want to remove from the PC
- Hit the Remove device button and click yes
After removing the printer, you can easily delete the driver from the laptop or PC. On the other hand, printer uninstallation can be done via the Control panel > Hardware & Sound > Devices & Printers. Then right-click the printer to remove
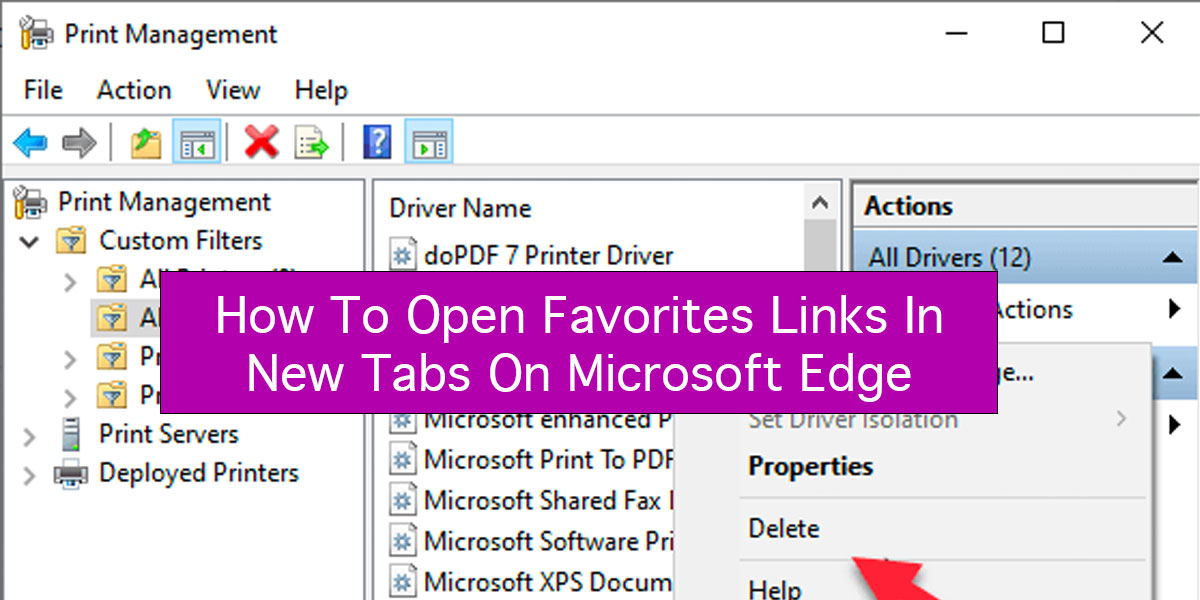
Delete printer driver from Print Management
- Open start and search and open the control panel
- Navigate to the system & Security window
- Choose Administrative Tools, then double-click click printer management option
- Expand custom filters and click on All drivers
- On the right side, right-click your printer adapter, then choose the Delete option
- Click Yes Button
After completing the step, the printer will be uninstalled from the computer. Repeat the same process if you have several printers until all printer drivers have been deleted from your computer.
Delete printer driver from PowerShell
Print management App is unviable in windows 10 Home. However, we can use PowerShell to delete printer drivers with ease. The instruction we provide below does not only apply to windows 10 Home but also Pro.
- Open start
- Search for the PowerShell app, and choose run as administrator from the result.
- Copy and paste the command Get-PrinterDriver | Format-List Name, then press the Enter key. This command lists all the printer drivers paired with your computer.
- Again, copy & paste Remove-PrinterDriver -Name “Your-Printer-Name” and press the enter command. This line of command will remove the printer driver you have chosen. However, we have Your-Printer-Name; substitute it with the name of your printer you found in the previous step. For instance, the command line can run as Remove-PrinterDriver -Name “Epson ESC/P-R V4 Class Driver”
If you do everything correctly, you shall have uninstalled the printer driver from windows 10. But if there is more than one printer, then you might repeat the process
We are not affiliated/associated with Microsoft who own Windows. “Windows” is a trademark of Microsoft Corporation.
The information contained on this website is for general information purposes only and any reliance you place on such information is strictly at your own risk.
Contact Microsoft Office
| India | +91 N/A N/A | (0)80 4010 3000 1 800 572 1100 1 800 102 1100 |
| United States | +1 +1 | (800) 642 7676 (800) 892 5234 (TTY) |
Terry White is a professional technical writer, WordPress developer, Web Designer, Software Engineer, and Blogger. He strives for pixel-perfect design, clean robust code, and a user-friendly interface. If you have a project in mind and like his work, feel free to contact him

